Semenza.es
Endoscopic Carpal Tunnel Release
Surgical Technique
Table of Contents
Indications and Contraindications
• Indications: The MicroAire Carpal Tunnel Release System is for
Indications / Contraindications . i
use in patients diagnosed with carpal tunnel syndrome that is
not associated with, or secondary to, any other known pathology
Warnings / Definitions . i
(i.e., "idiopathic" carpal tunnel syndrome). Preoperative x-rays of
the wrist, including a carpal tunnel view, are recommended to aid
in the diagnosis of associated pathology (i.e., calcific tendonitis,
fracture of the hook of the hamate). This device is indicated solely
for releasing the transverse carpal ligament (flexor retinaculum).
• Contraindications: The MicroAire Endoscopic Carpal Tunnel
Release System is not intended for use in patients with known
Troubleshooting Guide for Fogging .3
abnormalities of their wrist (carpal tunnel), including distal radial
deformities, rheumatoid and other synovitis.
Surgical Setup .4-5
Anesthesia .5
* The MicroAire Carpal Tunnel Release System uses a dry procedure.
No fluid or gas should be introduced into the carpal tunnel during
this procedure.
Operative Technique . 6-13
• The surgeon is specifically advised not to use the instrument to
Making the incision and creating a flap .6
explore and/or treat any structure other than the transverse carpal
ligament within, or outside of, the carpal tunnel. Failure to heed
this warning can lead to damage to the median or ulnar nerve,
Elevating the U-shaped flap .7
flexor tendons or superficial palmar arterial arch.
• If the surgeon is unable to clearly visualize an ulnar "strip" of the
transverse carpal ligament with a definite distal margin (which is
Preparing a path .7
typically characterized by a transition from ligament to fat), the
blade assembly should be withdrawn and the procedure should
be converted to another carpal tunnel release procedure.
Introducing the blade assembly .8
• If the surgeon has any questions or concerns regarding patient
anatomy, the surgical approach or instrument function—or if the
view is less than adequate—the instrument should be withdrawn
Defining the distal end of the ligament .9
and the procedure converted to another carpal tunnel release
Step 6 Incising the transverse carpal ligament. 9-11
• Failure to follow the proper training and surgical technique can
result in permanent injury to the patient. Endoscopic release of
the carpal tunnel using the MicroAire® SmartRelease® ECTR should
not be attempted until the surgeon has been trained at a
Inspecting the incised ligament . 12
MicroAire-sponsored workshop. This training requires thorough
familiarity with this Surgical Technique, the Instructions for Use
and gaining hands-on experience with a trained surgeon who is
Releasing the forearm fascia. 13
experienced with the device. The procedure should be performed
on cadaveric specimens before initial use. Operating room staff
should thoroughly review the MicroAire® SmartRelease® ECTR®
Instructions for Use (REF: IM-SMARTRELEASE) prior to set up
Closing and dressing the wound and wrist . 13
References . 13
Definitions
• NOTE: Indicates the easiest means of carrying out techniques.
• CAUTION: Indicates special procedures or precautions that must
MicroAire Surgical Instruments.
be followed to avoid damaging the system instrumentation.
This document is protected from any form
of unauthorized reproduction, duplication
• WARNING: Indicates that the safety of the patient and hospital
or distribution.
personnel could be involved.
SURGICAL TECHNIQUE
Traditionally, a patient treated surgically for carpal tunnel syndrome could expect significant recovery time
away from work due to the surgical wound in the palm and heel of the hand. When the carpal tunnel is released
endoscopically with the MicroAire® SmartRelease® ECTR, clinical results indicate that postoperative morbidity
is improved and time away from normal activities and full employment are reduced by as much as 46 percent.1
The safety of this device has also been documented in a large clinical study involving over 1,000 cases in a multi-
center study.2 The results of this study showed minimal complications.
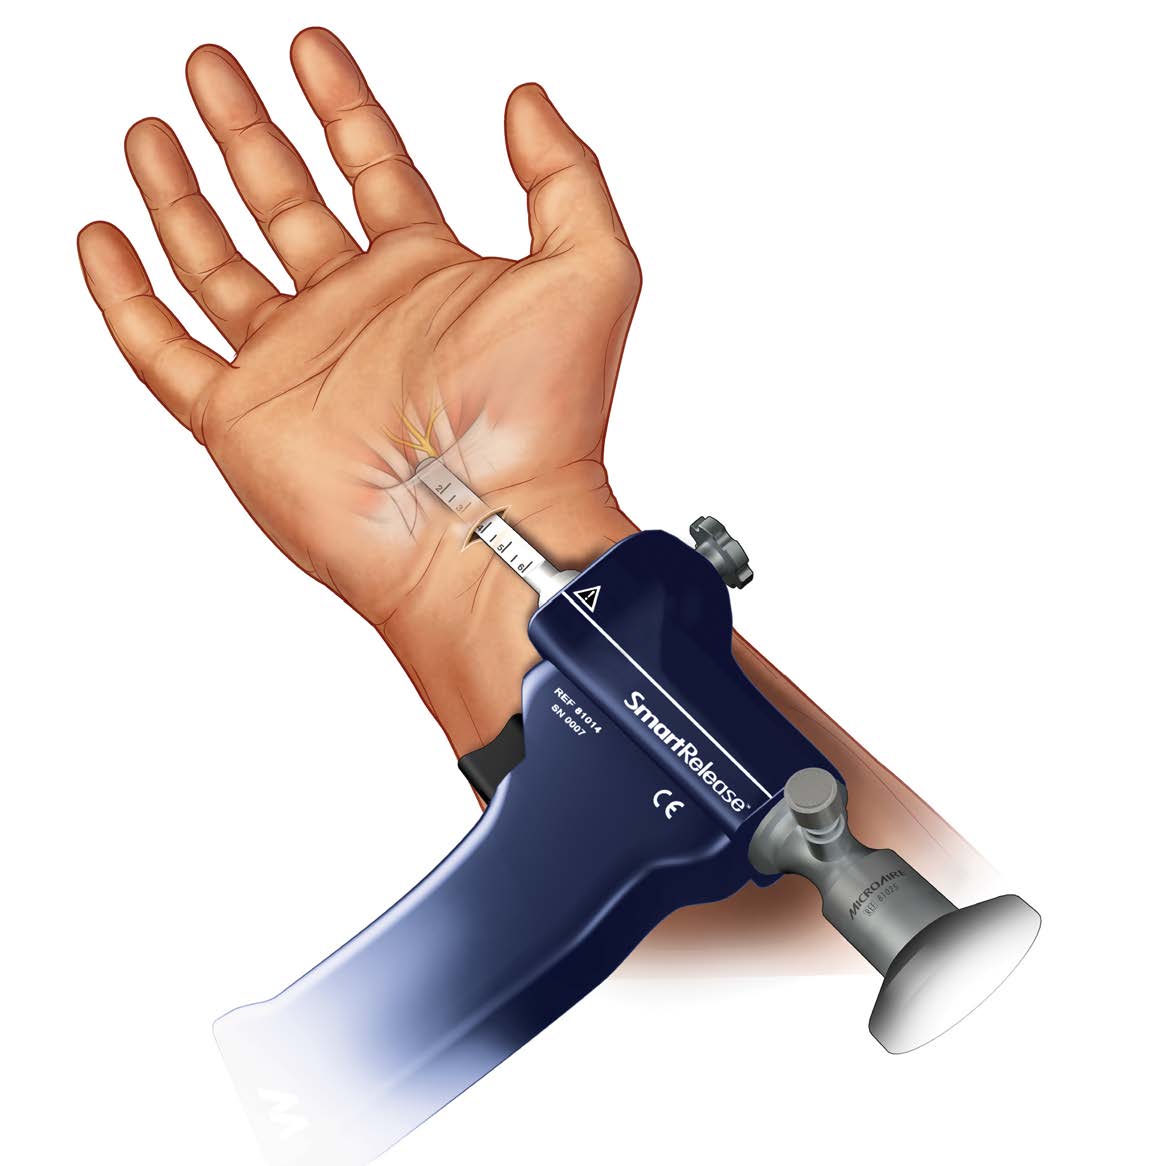
Comprised of an endoscope and a handpiece that holds an elongated, disposable blade assembly, the MicroAire®
SmartRelease® ECTR connects to any standard video camera and light source. The surgeon introduces the
blade assembly into the carpal tunnel through a limited incision in the wrist flexor crease.* Viewing the deep side
of the transverse carpal ligament (flexor retinaculum) through a window at the tip of the instrument, the surgeon
elevates the blade to cut the ligament as the instrument is withdrawn.
This Surgical Technique is provided as an educational tool and clinical aid to assist medical professionals in the proper
protocol for the MicroAire® SmartRelease® ECTR endoscopic carpal tunnel release instrumentation. For safe and
effective use, surgeons must possess a thorough knowledge and understanding of wrist anatomy and the endoscopic
technique using the MicroAire® SmartRelease® ECTR System. Instructional videotapes and cadaver workshops are
available through MicroAire Surgical Instruments.
Those considering using the MicroAire® SmartRelease® ECTR System should only do so after successfully completing
MicroAire's required surgical training as well as the relevant training mandated in the professional guidelines of any
pertinent hospital, institution or society. For training dates and locations, visit www.microaire.com
Failure to follow the Surgical Technique may result in permanent injury to the patient. If, while performing this
technique, any problems should arise, such as anatomical anomalies, inadequate visualization, inability to identify
anatomy or questions concerning technique or instrumentation, the surgeon should abandon the endoscopic
carpal tunnel release and convert to another carpal tunnel release procedure.
These pages are not intended to provide medical advice or physician instruction on the appropriate use of products
produced or supplied by MicroAire Surgical Instruments, its affiliates, related companies, or its licensors or other partners.
* The MicroAire® SmartRelease® ECTR uses a dry procedure.
No fluid or gas should be introduced into the carpal tunnel during this procedure.
MICROAIRE SMARTRELEASE® ECTR 1
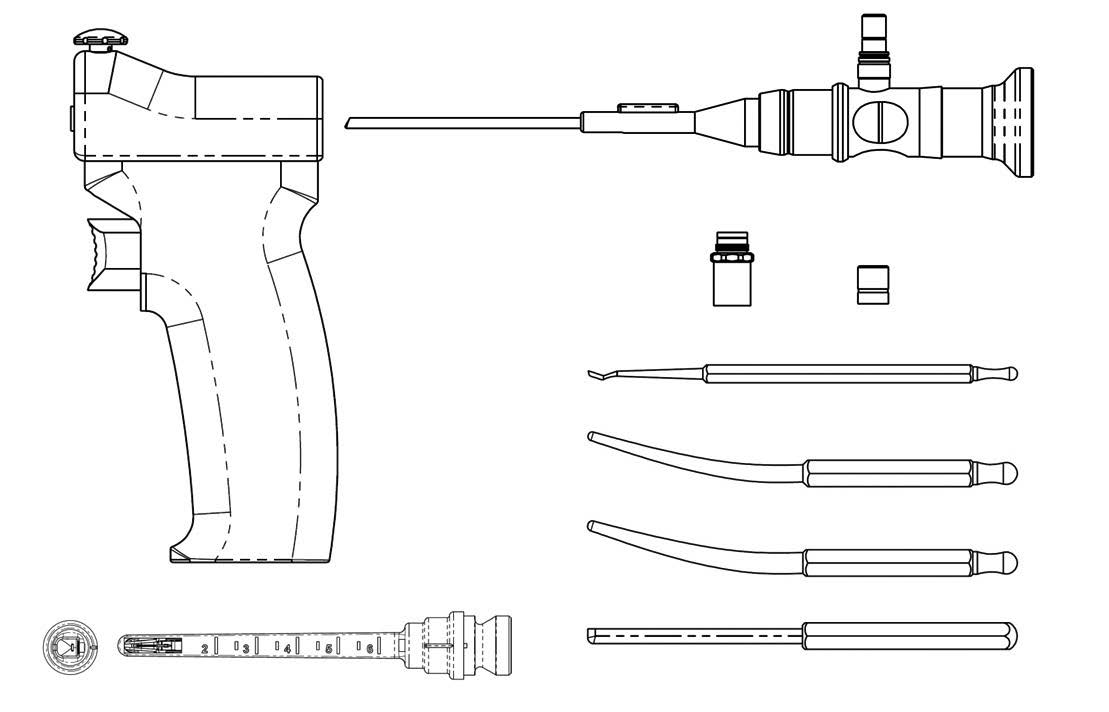
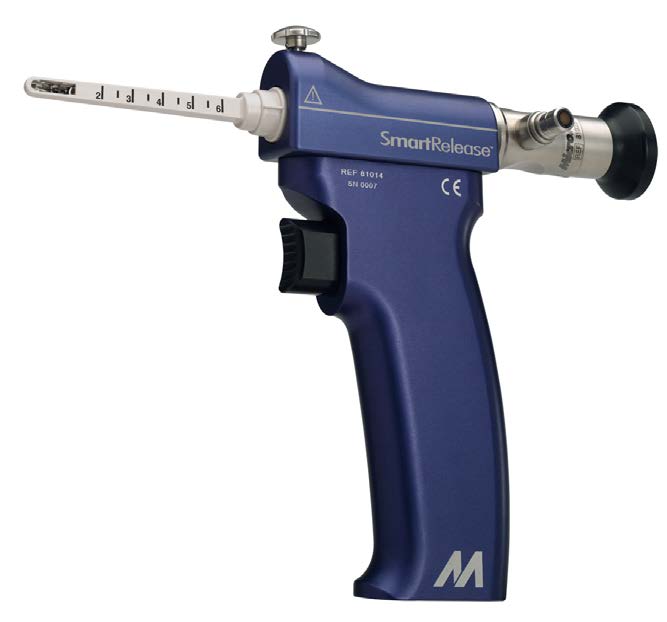
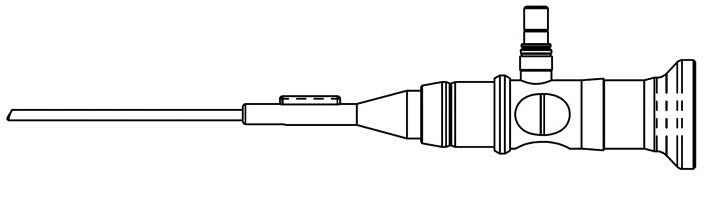
SmartRelease® ECTR Instruments and Accessories
A) SmartRelease® Aluminum Handpiece
B) ECTR Disposable Standard Blade Assembly
REF 81010-1 or 81010-6
C) 2.9mm Eyepiece Autoclavable Endoscope
D) Endoscope Light Post Adapter, Wolf®
E) Endoscope Light Post Adapter. Stortz®
F) Synovium Elevator
G) Hamate Finder – Small
H) Hamate Finder – Medium
I) Hamate Finder – Standard Coequal to 81010 Blade Assembly
J) Instrument Sterilization Tray
For additional information, consult the MicroAire Instructions for Use
2 SURGICAL TECHNIQUE
TROUBLESHOOTING GUIDE FOR FOGGING
In order to quickly identify the source of the fogging problem and formulate the appropriate solution, you should:
1. Assemble the system before the surgeon makes the skin incision to start the procedure.
2. Turn on the camera, light source and monitor. White balance using a white sponge and then lay a blue or green
towel on the window using the fabric of the towel to set the light intensity and to focus on the mid and distant
portion of the window.
3. Observe for any sign of fogging.
Fogging appeared
Moisture inside camera
Disassemble and dry
1. EtO or stream sterilize
before inserting
endoscope and camera
instead of soaking.
in to carpal tunnel
lenses with alcohol or
2. Using anti-fogging
agents to dry before
assembling.
3. Soak scope with
camera attached.
4. Keep system warm by
turning on light source.
Water trapped between
Use a sterile cotton swab to
Thoroughly dry the
plastic eyepiece and
soak up water around the gap
scope-camera coupler
between the scope lens and
interface with a cotton
plastic eyepiece.
swab after soaking.
Fogging after inserting
Condensation due to
1. Leave inside tunnel until
1. Connect to light source
into the carpal tunnel
temperature difference
scope warms to body temp.
to pre-warm.
between the scope and
2. Dip scope tip in to warm
2. Rinse scope with warm
patient's tissue.
saline and wipe dry.
saline after soaking.
Excess fluid inside the
Soak up excess fluid with
Avoide injecting anesthetics
sterile cotton swab.
in to the carpal tunnel.
Fuzzy or leave persisting
Always protect the scope
MicroAire Service
when not in use.
Beware of contamination caused by disassembling the camera and the scope in the
same sterile field if they have been attached together during soaking.
For additional information, consult the MicroAire Instructions for Use (REF: IM-SMARTRELEASE)
MICROAIRE SMARTRELEASE® ECTR 3
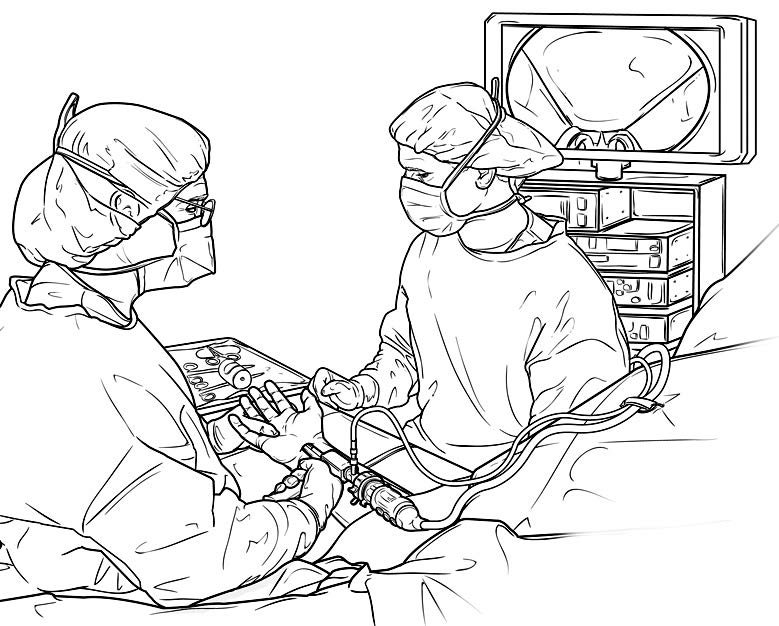
Two physical considerations dictate the best surgical setup: the surgeon's orientation with respect to the video
monitor and the patient's operative hand. The surgical suite should be set up to offer the surgeon the best view
of the video monitor. The surgeon should be able to easily shift his/her view upward from the surgical field to the
video image.
The patient is positioned supine on the operating room table with the arm abducted 75-80 degrees. A tourniquet
should be used in this procedure. Care should be taken to avoid pressure on the ulnar nerve at the elbow.
Sterile draping leaves the arm, elbow, forearm, wrist and hand distal to the tourniquet fully exposed to permit
exsanguination of the forearm and hand. The hand, wrist, forearm and the arm proximal to the elbow should be
completely exsanguinated using an Esmark bandage; venous blood trapped distal to the tourniquet will cause a
locally anesthetized patient premature pain.
The surgeon's hand, when holding the instrument, should naturally align the blade assembly so that it points from
the ulnar side of the carpal tunnel to the base of the ring finger. This course is anatomically optimal for avoiding
injury to the median nerve. Surgeons who are ambidextrous using the endoscope generally take the axillary
position when performing either a left or right carpal tunnel release (holding the instrument in their right hand
for a right carpal tunnel and in their left hand for a left carpal tunnel). Those favoring right-handed use will usually
prefer a position in the axilla for a right carpal tunnel release and cephalic position for a left release.
The patient's hand is positioned, palm up, on a hand table equidistant between the surgical assistant and the
surgeon. The surgeon should be able to easily view the monitor over the assistant's right or left shoulder.
If desired, a scrub nurse can sit at the end of the hand table. A movable cart, which holds the monitor, the light
source and camera electronics, is placed behind and with the monitor slightly to one side of the surgical assistant.
The fiber-optic cable is clipped to a drape at the patient's shoulder. [Figure II]
To conduct a carpal tunnel release procedure using the MicroAire® SmartRelease® ECTR, the sterile
field should include:
• 2 double-pronged skin hooks
• 2 Senn rake retractors
• 2 Ragnell right angle retractors
• 1 Adson tissue forceps with serrated tips
• 1 pair of tenotomy scissors
• 1 scalpel, #15 blade
• 1 Sterile skin marking pen
• 1 standard hamate finder*
• 1 small hamate finder*
• 1 Blade-shaped coequal hamate finder (optional)*
• 1 synovium elevator *
*(Included with MicroAire® SmartRelease® ECTR)
In the surgical suite—before the patient is
brought into surgery with the intention of
FIGURE II
performing the procedure endoscopically
— the MicroAire® SmartRelease® ECTR
should be fully assembled and checked for
correct operation, which includes blade
elevation and retraction and a clear video
image. The equipment, including the
instruments and video monitor, should be
positioned relative to the operating table
and surgeon's position after the extremity
is prepped and draped.
4 SURGICAL TECHNIQUE
SURGICAL SETUP CONTINUED
FIGURE III
B - Proximal wrist crease (incision line)
A - Flexor carpi radialis
A - Hook of hamate
A - Flexor carpi ulnaris
C - Construction line
Before elevation of the tourniquet, it is recommended that the surgeon mark key anatomical landmarks on the
patient's hand using a sterile skin marking pen: the tendons of the flexor carpi ulnaris and flexor carpi radialis,
pisiform bone and hook of the hamate. [Figure III]
In addition, the surgeon should select and mark the intended incision line at a wrist flexion crease.
Finally, the surgeon should draw a construction line from the middle of the wrist flexion crease to the palmar base
of the ring finger. This line should pass radial to the mark over the hook of the hamate.
A general or regional anesthetic is strongly recommended. Local anesthetic increases tissue fluid, which can
obscure endoscopic viewing and cause lens fogging. Only when the surgeon has gained experience with the
surgical approach and instrumentation should the procedure be performed using local anesthesia.
When local anesthesia is used, the tourniquet is elevated and a volume of one percent Lidocaine without
epinephrine is injected intracutaneously/subcutaneously in the wrist flexion crease, extending from the flexor carpi
ulnaris to the flexor carpi radialis. Use the least amount of local anesthesia possible. Avoid injecting/adding local
anesthesia deep to the forearm fascia as it will extend into the carpal tunnel, compromising the endoscopic view of
the transverse carpal ligament.
When beginning the local anesthesia, it is important that the patient receive minimal or no sedation. A sedated patient
may move abruptly in response to discomfort when instrumentation is being introduced into the tunnel. Frequently, local
anesthesia requires support with other anesthetic agents as prescribed by the anesthetist or surgeon.
To help minimize the opportunity for patient injury under local anesthesia, it is very important that:
(1) The surgeon and assistant be prepared to manually restrain any sudden movements by the patient; and
(2) The instruments (i.e. synovium elevator, hamate finders and blade assembly) should be passed down the carpal
tunnel in a manner that will help avoid injury to the median nerve (and other carpal tunnel structures) if the patient
moves suddenly.
MICROAIRE SMARTRELEASE® ECTR 5
Flexor carpi ulnaris
Making the incision in a wrist flexion crease.
Palmar cutaneous branch of median nerve
Choose a wrist flexion crease that is just proximal
Flexor carpi radialis
to the crease that separates the glabrous skin of
the palmar surface of the hand and the "mobile" skin
of the forearm. Make a 2 - 3cm transverse incision
between the tendons of the flexor carpi radialis and
the flexor carpi ulnaris. Take care to stop short of the
subcutaneous tissues and their cutaneous nerves.
Use a spreading longitudinal dissection to protect
these nerves and expose the forearm fascia. [Figure I]
Palmar cutaneous branchof ulnar nerve
Note
• If faced with choosing between two otherwise
suitable wrist flexion creases, the more proximal
crease is technically easier to use because of less
subcutaneous fat.
If necessary, skin incision
• With experience, surgeons may choose to use a
may be extended using
smaller incision, centered at the middle of the
wrist, between the flexor carpi ulnaris and the
flexor carpi radialis.
• If necessary, the transverse incision across the wrist
can be extended proximally and distally, perpendicular
to the transverse incision to convert to an open release
procedure (refer to inset).
OPERATIVE TECHNIQUE
• The transverse incision may overlie the palmar
cutaneous branch of the median nerve. If the palmar
cutaneous branch of the median nerve is visualized in
the radial side of the wound, it can be gently isolated
and retracted.
FIGURE 1-A
Making the incision, continued.
Location of fascia incision
Make a U-shaped incision in the forearm fascia,
Avoid excessive traction
creating a rectangular flap distally based on the
transverse carpal ligament. Preparing and elevating
this U-shaped flap from the underlying finger flexor
synovium (ulnar bursa) allows the surgeon to
develop a plane between the synovium and the
deep side of the transverse carpal ligament.
Palmar cutaneous branch
The median nerve is immediately beneath this
Avoid excessive traction on the ulnar neurovascular
bundle, which may result in ulnar nerve neuropraxia.
6 SURGICAL TECHNIQUE
OPERATIVE TECHNIQUE CONTINUED
Elevating the U-shaped flap of forearm fascia
Fascia and distal edge of
and creating a path into the carpal tunnel.
wound being elevated
While vertically elevating the flap of forearm fascia
in a palmar direction, use tenotomy scissors to
gently spread and separate the forearm fascia from
the synovium of the ulnar bursae. Position the
synovium elevator in line with the base of the ring
finger, radial to the hook of the hamate. Using the
synovium elevator, feel the roughness ("washboard
effect") of the transverse fibers of the transverse
carpal ligament. Continue to separate the ulnar
bursa (synovium) distally until its tip is palpable at
the distal end of the carpal tunnel. [Figure 2]
To optimally orient the synovium elevator with
the deep side of the transverse carpal ligament,
it is recommended that the surgeon hold the
patient's hand with the opposite (non-instrument)
hand. The position of the patient's wrist in the
flexion-extension plane can then be adjusted.
Recurrent motor branchof median nerve
Preparing a path for the instrument.
Transverse carpal
Use the small hamate finder to create a path for
the blade assembly. While aiming at the base of
the ring finger and holding the wrist in slight
extension, gently pass the hamate finder distally
down the ulnar side of the tunnel, hugging the
hook of the hamate until the finder's curved tip
can be palpated subcutaneously as it exits the
carpal tunnel. One or two passes is sufficient to
create a path. Use the standard or blade shaped
hamate finder for larger hands. [Figure 3]
Superficial palmar arch
MICROAIRE SMARTRELEASE® ECTR 7
OPERATIVE TECHNIQUE CONTINUED
Introducing the blade assembly into the
carpal tunnel.
Blade extension and retraction should be checked
before insertion into the patient's hand.
Holding the patient's wrist in slight extension,
insert the blade assembly into the carpal tunnel,
pressing the viewing window snugly against the
deep side of the ligament. While aiming at the
base of the ring finger, advance the instrument
distally, hugging the hook of the hamate to
assure an ulnar course. [Figure 4]
Note
To optimally orient the window of the endoscope with the deep side of the transverse carpal ligament, it is recommended
that the surgeon hold the patient's hand with the opposite (non-device) hand. The position of the patient's wrist in the
flexion-extension plane can then be adjusted as needed to view the entire length of the transverse carpal ligament.
Using the thumb of the non-device hand, the surgeon can palpate the tip of the blade assembly and hold the overlying
tissues against the viewing window such that it is snugly apposed to the deep side of the ligament prior to, and during,
blade elevation and subsequent cutting.
The disposable blade assembly is marked with a centimeter scale for surgeons who wish to integrate their knowledge of
surface anatomy with the actual endoscopic view. This scale serves as a relative guide of the blade assembly's depth of
insertion so that the surgeon can determine by direct measurement where the elevated blade will cut into the transverse
carpal ligament.
To avoid injury to the median nerve and flexor tendons, during the cutting stroke it is imperative that the flat
surface of the blade assembly be pressed and held snugly against the deep side of the transverse carpal ligament.
FIGURE 4-A
Flexor carpi radialis
Introducing the blade assembly, continued
Blade assembly crosses over and superficial to the
median nerve at the level of the skin incision.
Note
Be sure to positively identify the proximal end of the
carpal tunnel (differentiating it from Guyon's canal)
before inserting the blade assembly. Guyon's canal is
superficial to the ulnar side of the carpal tunnel.
A good double check: When inserting the blade
assembly, be sure the space (canal) contains synovium.
To check, move the patient's fingers passively for
Transverse carpal ligament
confirmation as the synovium, and to a lesser extent
the median nerve, moves proximal and distal with the
finger flexor tendons. [Figure 4-A]
Do not attempt to use this device to explore the carpal tunnel. This device is designed exclusively for viewing the deep side
of the transverse carpal ligament. Using the blade assembly as a probe or lever may cause severe injury to the patient and
can damage the scope's optical train or break the blade assembly.
Note that the proximal extent of Guyon's canal (just distal to the skin incision) is variable in its radial extent.
In an occasional patient, the radial extension of the "roof" of Guyon's canal (the volar carpal ligament) may be confused
with the antebrachial fascia or the transverse carpal ligament. Correct entry occurs under a fascial plane that covers finger
flexor synovium.
8 SURGICAL TECHNIQUE
OPERATIVE TECHNIQUE CONTINUED
Transverse carpal ligament
Defining the distal end of the transverse
carpal ligament.
Use a sufficient number of proximal-to-distal passes
to accurately define an ulnar "strip" of the transverse
carpal ligament. Transverse fibers of the ligament
should be visible within this strip. Palpating with the
thumb, define the distal margin of the ligament at
its junction with a pad of fat and align the point of
entry markers at this junction. [Figure 5]
Note
The fat typically overlaps the deep side of the ligament's distal margin by a couple of millimeters.3 This contrasts with the
occasional patient that lacks a clear distal margin of this ligament as defined by its junction with a pad of fat. If this or
other anatomic details fail to provide orientation to critical anatomy, abandon the endoscopic approach and convert to an
open carpal tunnel release procedure.
Do not insert the tip of the blade assembly beyond the end of the transverse carpal ligament. This avoids a stretch injury
to the small nerve that sends communicating fibers between the ulnar nerve and the median nerve just distal to the
carpal tunnel.
Applying excessive pressure to the endoscope and blade assembly may damage the endoscope's optics.
An unclear image may indicate fogging. Please refer to the Troubleshooting section on page 11.
Incising the transverse carpal ligament.
Please study all steps (6, 6A, 6B, 6C and 6D) before
proceeding. Assure continued correct positioning,
hugging the hook of the hamate and tracking the
course of the blade assembly while maintaining
ring finger aim. [Figure 6]
Note
The surgeon may choose to release the entire
ligament in a single pass; however, there are
advantages to releasing the ligament in two
stages (distal half then proximal half).
1 Aim at ring finger.
2 Hug hook of hamate.
3 Apply upward pressure on blade assembly to keep window snug against transverse carpal ligament.
4 Elevate blade and withdraw instrument to divide the distal one half of the transverse ligament while
maintaining steps 1-3. [Figure 6]
MICROAIRE SMARTRELEASE® ECTR 9
OPERATIVE TECHNIQUE CONTINUED
FIGURE 6-A
Transverse carpal ligament
Incising the distal half of the transverse carpal
Elevate the blade so that it engages the distal margin
of the ligament. Firmly but gently withdraw the
blade assembly to divide the distal one half of the
transverse ligament. Release the trigger to retract
the blade. [Figure 6-A]
Communicating branch of
Note
A fat pad lays superficial to the proximal portion of the
carpal ligament. Leaving the proximal portion of the
ligament intact on the first pass prevents this fat from
Proximal "superficial" fat pad
prolapsing onto the viewing window. This prolapsed
fat can compromise the path available for reinserting
the blade assembly and can interfere with visualizing
the completeness of the ligament release.
Note that blade is being elevated in both pictures
to touch the distal margin of the ligament. Partial
elevation is the best way to determine where the
blade will engage the ligament.
INCISING DISTAL HALF
FIGURE 6-B
Incising the distal half, continued.
Reposition the blade assembly window to check for
a complete release of the distal half of the transverse
carpal ligament. Use partial or complete elevation of the
blade to selectively divide the remaining collagen fibers
with interposed fat and/or muscle. Complete release is
indicated by the retraction of the two halves of the
ligament in radial and ulnar directions. [Figure 6-B]
Transverse carpal ligament
Note: Distal one-halfof ligament is completely released
Note: Proximalone-half of ligamentintact to be releasedin Step 6-D
Cut edge of transversecarpal ligament
DISTAL RELEASE FIRST
10 SURGICAL TECHNIQUE
OPERATIVE TECHNIQUE CONTINUED
FIGURE 6-C
Incomplete release of distal margin
of ligament where ligament is
Incomplete release of the distal margin.
overlapped by distal fat pad.
In a typical patient, the distal margin of the
Cut edge of ligament
ligament is defined by its junction with a pad
Undivided proximal
of fat. This fat usually overlaps the deep side
one-half of ligament
of the free margin of the ligament by a couple
of millimeters.3 [Figure 6-A]
Incompletedistal release
Occasionally a few fibers of the carpal ligament
hidden by this fat will remain undivided after
the first pass of the blade. These very distal
fibers of ligament overlapped by fat can be
visualized and must be divided using partial
blade elevations with subsequent passes of
Note: Distal fat pad
the blade assembly. [Figure 6-C]
typically overliesdistal ligament bya couple of millimeters
FIGURE 6-D
Releasing the proximal portion
of the ligament.
Releasing the proximal half of the transverse
Proximal one-half
When the distal half of the ligament has been
completely released, reposition the viewing
window at the proximal extent of the previous
cut, elevate the blade into the apex of the "V"
and withdraw the device to divide the remaining
proximal portion of the ligament. Follow the
same precaution: Aim at the ring finger, hug the
hook of the hamate and hold the blade assembly
snugly against the deep side of the ligament while
withdrawing the blade assembly. [Figure 6-D]
in to apex of "V"
Caution
Blade extension and retraction should be checked following assembly of the device—before use on the patient.
When fully extended, the blade forms an approximate 80-degree angle to the flat surface of the blade assembly
and measures approximately 3.5mm in height. If the blade does not extend and retract properly during system
checkout, the device should not be used.
Warning
To avoid injury to the median nerve and flexor tendons, it is imperative that the viewing window of the blade
assembly be held snugly against the deep side of the transverse carpal ligament.
If the blade fails to retract after the trigger is released, follow these steps for safe removal:
1. Release the blade lock screw while supporting the handpiece. Use the scope to view the blade to ensure blade retraction.
2. If the blade remains elevated, carefully separate the blade assembly from the handpiece, leaving the blade assembly in
the carpal tunnel. Use the endoscope to view the blade position as the handpiece is removed from the blade assembly.
The blade assembly is left in the carpal tunnel.
3. If the blade has not returned to a retracted position, do not remove the blade assembly from the carpal tunnel through
the endoscopic portal. Convert to an open procedure to remove the blade assembly. Inspect the blade assembly to make
sure no parts are missing. If a part is missing, take an x-ray of the patient's hand.
MICROAIRE SMARTRELEASE® ECTR 11
OPERATIVE TECHNIQUE CONTINUED
FIGURE 7-A
Remaining transverse
Inspecting the incised transverse
bundles of collagen
fibers (superficial to TCL)
Release the trigger to retract the blade. Reinsert
the blade assembly to inspect the completeness
of the ligament division. [Figure 7-A]
With the blade retracted, the assembly may be
rotated after a complete release to allow the sur-
geon to inspect the cut edges of ligament.
Complete release - The blade assembly has
been reinserted between the two cut edges of the
ligament, which have retracted beyond the width
of the blade assembly. Note the fat and transverse
fibers of the palmar fascia which remain superficial
FIGURE 7-B
(palmar) to the divided ligament. [Figure 7-A]
Complete release - After complete release
and blade assembly rotation, each separate
cut edge of the ligament will "flop." [Figure 7-B,
Viewed with blade assembly rotated 20-degrees]
Cut edge of transverse carpal
When additional cuts are necessary, be sure to
FIGURE 7-C
position the window of the blade assembly in,
and/or between, the cut edges of the ligament
to avoid injuring the median nerve. Partial blade
Undivided portion
elevation is frequently useful in completing the
ligament division to avoid dividing tissues palmar
(superficial) to the ligament.
Incomplete release - A "V" shaped defect
is created when the palmar (superficial)
fibers of the transverse carpal ligament
remain intact. [Figure 7-C]
In addition to the video monitor image, assess completeness of ligament division by several means:
• sensing the reduced "pressure" upon the instrument when it is reinserted in a decompressed carpal tunnel.
• noting the more subcutaneous course of the blade assembly after division.
• palpating the divided ligament with the hamate finders.
• inserting a small right-angle retractor and looking directly inside of the released carpal tunnel at the cut edges
of the ligament.
12 SURGICAL TECHNIQUE
OPERATIVE TECHNIQUE CONTINUED
Releasing the forearm fascia.
Release forearm fascia
Using tenotomy scissors, release the forearm fascia
using tenotomy scissors
proximal to the skin incision, taking care to protect
the median nerve. This prevents the forearm fascia
from acting as a constricting band that could
continue to compromise median nerve function.
Before lowering the tourniquet, insert the blade
assembly (blade retracted), positioning the viewing
window at the distal end of the tunnel to inspect for
potentially troublesome arterial bleeders. Release
the tourniquet and slowly withdraw the instrument.
Closing and dressing the wound and wrist.
The use of an intracuticular suture to close the skin gives the best cosmetic result. Following wound closure,
dress the wrist and hand by a method that allows full thumb use and opposition post-operatively.
1 Agee, JM et al. Endoscopic Release of the Carpal Tunnel: A Randomized Prospective Multicenter Study.
Journal of Hand Surgery. 1992; 17(6):987-995.
2 Agee, JM et al. Endoscopic Carpal Tunnel Release: A Prospective Study of Complications and Surgical Experience.
Journal of Hand Surgery. 1995; 20A(2):165-171.
3 Rotman, MB, Manske, PR. Anatomic Relationships of an Endoscopic Carpal Tunnel Device to Surrounding Structures.
Journal of Hand Surgery. 1993; 18A(3):442-450.
MICROAIRE SMARTRELEASE® ECTR 13
Additional Material Available from MicroAire
SmartRelease® ECTR
Surgeon Training Binder
Surgical skills training guidelines for
surgeons learning to perform the
MicroAire endoscopic procedure (Order: LIT-ECTR_SurgeonBinder)
SmartRelease® ECTR
Instructions for Use
Assembly, operation
SmartRelease® ECTR
SmartRelease® ECTR
Cleaning and sterilization
wall chart for the MicroAire
SmartRelease® ECTR® System
My Carpal Tunnel
Patient-information brochure
about options for the
treatment of carpal tunnel
syndrome (Order: LIT-CTRS_Patient)
Web-based patient
information about options
for the treatment of carpal
Phone 800.722.0822
MicroAire Surgical Instruments
3590 Grand Forks BoulevardCharlottesville, VA 22911
2015 MicroAire Surgical Instruments. All rights reserved. LIT-ECTR_Tech REV C
Source: http://semenza.es/pdf/LIT-ECTR-Tech_REV-C.pdf
The Ties That Bound a County Railway Heritage Tour of Perth County Railway rivalry, expansions and an even an explosion created drama in Stratford and Perth County long before any actor set foot on a stage. Experience the railway heritage of Stratford, St. Marys and Listowel while hiking along former railway lines, learning about the interesting people who helped build the railway's strong hold and viewing some of the last, and best preserved railway buildings in Ontario.
January 2008 SMART Holiday Party 2007 was a huge success, and all of us enjoyed the talented performances, tasty food, lively music, great dancing, and wonderful CD gifts. Many thanks to all who helped Class for out at the SMART Holiday Parents of Party 2007. Thanks to Bill Stinebaugh and Eggleston Services for the use of the